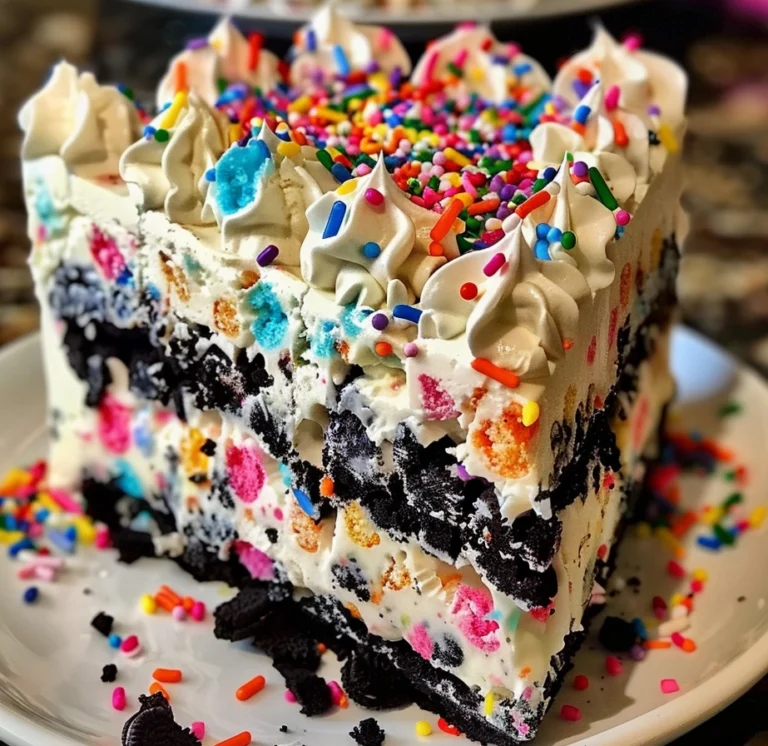
Dive into layers of pure joy with this No-Bake Funfetti Oreo Icebox Cake! This dessert combines the crunch of Birthday Cake Oreos with a creamy, sprinkle-infused filling, making it a perfect festive treat. It’s simple to assemble, requires no baking, and is a hit at any party or gathering. Plus, the colorful sprinkles add a pop of fun to every slice. Whether you’re celebrating a birthday or just in the mood for something sweet, this icebox cake is sure to delight!


No-Bake Funfetti Oreo Icebox Cake
Description
Dive into layers of pure joy with this No-Bake Funfetti Oreo Icebox Cake! This dessert combines the crunch of Birthday Cake Oreos with a creamy, sprinkle-infused filling, making it a perfect festive treat. It’s simple to assemble, requires no baking, and is a hit at any party or gathering. Plus, the colorful sprinkles add a pop of fun to every slice. Whether you’re celebrating a birthday or just in the mood for something sweet, this icebox cake is sure to delight!
Ingredients
- 2 packages Birthday Cake Oreos (or regular/Double Stuf)
- 2/3 cup milk
- 1¾ cups heavy whipping cream
- 1/2 cup confectioners’ sugar
- 3/4 cup dry white cake mix (just the powder)
- 8 oz cream cheese, softened
- 2/3 cup granulated sugar
- 2 tsp vanilla extract
- 3/4 cup rainbow sprinkles
- Additional whipped cream and sprinkles for garnish (optional)
Instructions
- Grease a 9″ round springform pan.
- In a stand mixer, whip heavy cream to soft peaks. Add confectioners’ sugar and cake mix powder, whipping to stiff peaks. Stir in sprinkles and set aside.
- Cream together cream cheese, granulated sugar, and vanilla until smooth. Fold in whipped cream mixture.
- Spread a thin layer of cream mixture in the pan. Dip Oreos in milk and arrange on the bottom. Top with 1/3 of the cream mixture. Repeat layering twice, ending with cream.
- Chill for at least 4-6 hours, or overnight.
- Garnish with whipped cream and sprinkles before serving.
Notes
This cake can be customized with different Oreo flavors to match your celebration theme or preference.
FAQs for No-Bake Funfetti Oreo Icebox Cake
1. Can I make this cake ahead of time? Yes, this cake is perfect for making ahead of time. It needs several hours to chill and set properly, so preparing it a day in advance can actually enhance its flavor and texture.
2. What can I use if I don’t have Birthday Cake Oreos? If you can’t find Birthday Cake Oreos, you can use regular Oreos or any other flavored Oreos that you prefer. The cake will still be delicious!
3. Can I substitute the heavy whipping cream? If you prefer a lighter version, you can substitute the heavy whipping cream with an equal amount of full-fat coconut milk or a whipped topping like Cool Whip.
4. How do I store the leftover cake? Store any leftovers in the refrigerator, covered, for up to 3 days. Make sure it’s tightly covered to prevent the cake from absorbing other flavors from the fridge.
5. Is there a vegan option for this cake? To make a vegan version, use vegan cream cheese, plant-based whipping cream, and ensure your sugars are vegan. Use a dairy-free milk alternative for dipping the Oreos.
6. Can I add or replace the toppings? Absolutely! Feel free to customize the toppings based on your preferences. Suggestions include crushed nuts, chocolate sprinkles, or even fruit like sliced strawberries for a fresh twist.
7. How do I ensure the layers are distinct and don’t mix? To keep the layers distinct, make sure the first layer is set firmly in the refrigerator before adding the next layer. Also, apply each layer gently and evenly.


